
Range Cooling Fan Sensor Board (replaces WB27T1...
Part #WB27X28659
$25.04 |
19% OFF Phone Price : $31.04
Range Cooling Fan Sensor Board (replaces WB27T1...
Part #WB27X28659

This DIY repair guide explains how to replace the on/off switch on a sewing machine. The on/off switch turns on the sewing machine's power and work light. If the work light won't come on with a new bulb when you turn on the on/off switch, replace the switch with the manufacturer-approved replacement part.
Use these steps to replace the on/off switch in common Kenmore and Brother sewing machines.
This video explains how to replace the on/off switch in a sewing machine.
Unplug the sewing machine’s power cord from the wall outlet.
Remove the screws securing the belt cover to the sewing machine and pull the belt cover off.

PHOTO: Remove the front screw from the belt cover.
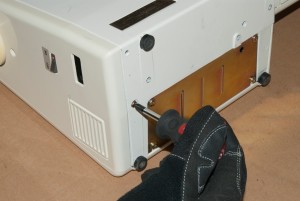
PHOTO: Remove the bottom screw from the belt cover.
Remove the screws securing the On/Off switch to the mounting bracket.
Remove the terminal block mounting screws and remove the terminal block.
Disconnect the On/Off switch wires from the terminal block and remove the On/Off switch.

PHOTO: Remove the terminal block mounting screws.
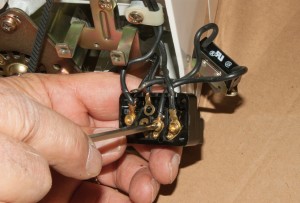
PHOTO: Remove the on/off switch wires from the terminal block.
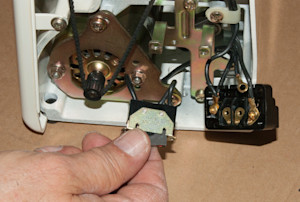
PHOTO: Remove the on/off switch from the sewing machine.
Connect the new On/Off switch wires to the terminal block.
Reinstall the terminal block and screws. Position the new On/Off switch on the mounting bracket and reinstall the mounting screws.

PHOTO: Reconnect the on/off switch wires.
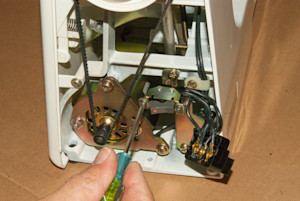
PHOTO: Install the new on/off switch.
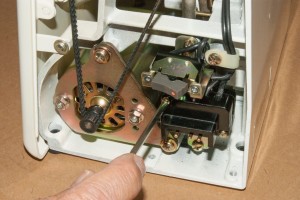
PHOTO: Reinstall the terminal block.
Position the belt cover on the sewing machine and reinstall the belt cover mounting screws.
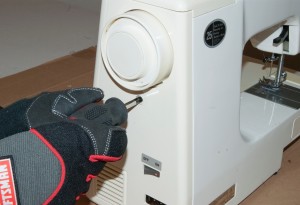
PHOTO: Reinstall the drive belt cover.
Plug the sewing machine into the electrical outlet.

Choose a symptom to see related sewing machine repairs.
Main causes: dirty shuttle race, improper thread routing, incorrect thread tension…
Main causes: dirty shuttle race, wrong thread tension, bad needle timing, damaged needle, using the wrong type of needle…
Main causes: thread bunched up in the shuttle race, bad needle timing, internal drive gear failures…
Main causes: machine needs lubrication, internal gear failure…
Main causes: problems with the feed dogs, setting stitch length to 0…
Main causes: lack of lubrication, lint buildup, worn drive belt, faulty drive motor…
Main causes: disengaged clutch, broken drive belt, internal drive gear failure…
Main causes: faulty foot pedal, locked drive gears, wiring failure, bad drive motor…
Main causes: power supply failure, bad power cord, faulty On/Off switch…
These step-by-step repair guides will help you safely fix what’s broken on your sewing machine.

If the sewing machine is completely dead, replace the On/Off switch using these 6 steps.…

You can replace a broken sewing machine drive belt in about 15 minutes. …

If the drive motor on your sewing machine runs roughly or doesn't run at all, you can replace it in about 30 minutes usi…
Use the advice and tips in these articles and videos to get the most out of your sewing machine.

Learn about all the convenient features on our Sears PartsDirect website that make your parts purchases easier.…

Get answers to frequently asked questions about Sears and Sears PartsDirect.…

Learn how to use a multimeter to check for wiring problems in an appliance that's not working…
