- Kenmore refrigerator water filters
- Whirlpool refrigerator water filters
- Samsung refrigerator water filters
- GE refrigerator water filters
- LG refrigerator water filters
- Frigidaire refrigerator water filters
- KitchenAid refrigerator water filters
- Maytag refrigerator water filters
- Kenmore Elite refrigerator water filters
- Estate refrigerator water filters
- GE Profile refrigerator water filters
- Amana refrigerator water filters
- Bosch refrigerator water filters
- Dacor refrigerator water filters
- Electrolux refrigerator water filters
Can’t find your part? Contact us: +1-309-603-4777
Top DIY repair help
View All Repair Categories
Appliances
Lawn & Garden
Power Tools
Home Improvement
Sports & Leisure
Heating & Cooling
OrdersSchedule a repair
Keep track of the models you own in your profile
Sign in or Register to view or add models
How to replace the agitator dogs in a top-load washer
This DIY washer repair guide explains how to replace the agitator dogs in a top-load washer. The agitator dogs grip the teeth inside the agitator to create a one-way ratcheting motion in the upper part of the agitator. That one-way motion combines with the back-and-forth motion at the bottom of the agitator to move garments through the water during the agitate cycle. If the top part of the agitator moves in two directions, the agitator dogs have likely worn out. Replace the agitator dogs with a manufacturer-approved replacement part.
Use these steps to replace agitator dogs in Kenmore, Whirlpool, Maytag, Estate, Crosley, Roper and Amana top-load washers.
Quick links
Video
Instructions
Tools required
Socket wrench set
Socket extension
Work gloves
Repair difficulty
Time required
15 minutes or less
Repair difficulty
Time required
15 minutes or less
Replacing the agitator dogs on a top-load washer
This video explains how to replace the agitator dogs on a top-load washer.
Instructions
- 01.
Shut off the electricity
Unplug the power cord from the wall outlet.
Wear work gloves to protect your hands.
- 02.
Remove the agitator
Pull the fabric softener dispenser off of the top of the agitator.
Pull the dust cap out of the agitator.
Use a 7/16" socket with an extension to remove the agitator bolt.
Pull the agitator out of the washer and set it on a work surface.
Tip: If your agitator has a plastic spring retainer above the agitator bolt with a 1/2" square hole at the top, use a 1/2" ratchet drive extension and ratchet to remove the spring retainer.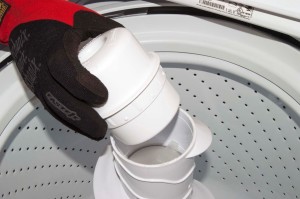
PHOTO: Remove the fabric softener dispenser from the top of the agitator.
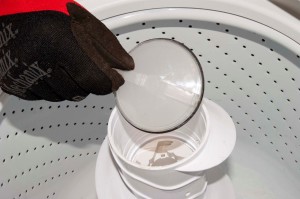
PHOTO: Remove the agitator dust cap.
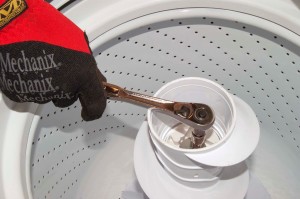
PHOTO: Remove the bolt from the agitator.
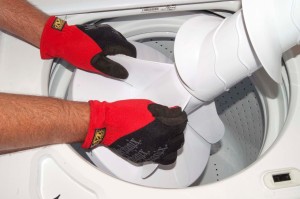
PHOTO: Pull out the agitator.
- 03.
Remove the agitator dogs
Pull the top auger off of the agitator assembly.
Dump the agitator cam out of the top of the agitator auger.
Remove the plastic bearing from the cam. The plastic bearing holds the agitator dogs in place.
Pull the agitator dogs off of the cam.
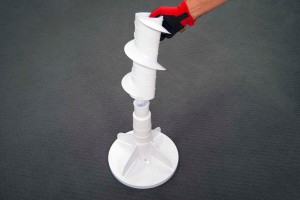
PHOTO: Pull the top auger off the agitator.
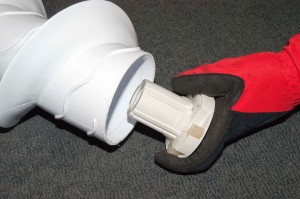
PHOTO: Dump the cam out of the agitator.
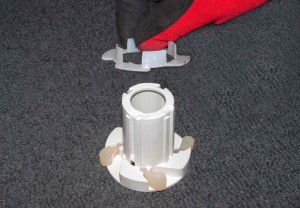
PHOTO: Remove the plastic bearing from the agitator cam.
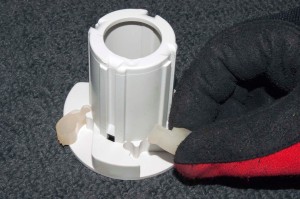
PHOTO: Remove the agitator dogs.
- 04.
Install the new agitator dogs
Push the new agitator dogs into the cam.
Reinstall the plastic bearing on the cam to hold the agitator dogs in place.
Push the cam back into the agitator auger.
Position the auger back onto the top of the agitator assembly.
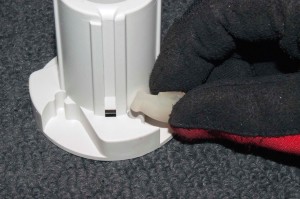
PHOTO: Install the new agitator dogs.
- 05.
Reinstall the agitator
Push the agitator down on top of the agitator shaft.
Reinstall the 7/16" bolt and washer to secure the agitator to the agitator shaft.
Reinstall the dust cap.
Snap the fabric softener dispenser back on top of the agitator assembly.

PHOTO: Reinstall the agitator on the agitator shaft.
- 06.
Restore the power
Plug the washer into the electrical outlet.
Warning: Undertaking repairs to appliances can be hazardous. Use the proper tools and safety equipment noted in the guide and follow all instructions. Do not proceed until you are confident that you understand all of the steps and are capable of completing the repair. Some repairs should only be performed by a qualified technician.
Was this information helpful?


Most common symptoms to help you fix your washers
Choose a symptom to see related washer repairs.
Main causes: clogged drain hose, house drain clogged, bad drain pump, water-level pressure switch failure, bad control b…
Main causes: worn agitator dogs, bad clutch, broken motor coupler, shifter assembly failure, broken door lock, suspensio…
Main causes: bad lid switch or door lock, bad timer or electronic control board, wiring failure, bad water inlet valve a…
Main causes: broken lid switch or lid lock, bad pressure switch, broken shifter assembly, faulty control system…
Main causes: unbalanced load, loose spanner nut, worn drive block, broken shock absorber or suspension spring, debris in…
Main causes: no water supply, bad water valves, water-level pressure switch failure, control system failure, bad door lo…
Main causes: lack of electrical power, wiring failure, bad power cord, electronic control board failure, bad user interf…
Main causes: leaky water inlet valve, faulty water-level pressure switch, bad electronic control board…
Main causes: water heater failure, bad water temperature switch, faulty control board, bad water valve, faulty water tem…
Repair guides for top-load washers

How to replace the motor coupler on a top-load washer
If the washer drains but won’t agitate or spin, the motor coupler might have broken to protect the drive motor from dama…
Repair difficulty
Time required
60 minutes or less

How to replace the agitator dogs in a top-load washer
If the top of the agitator moves both ways instead of just one, replace the agitator dogs, using the steps in this repai…
Repair difficulty
Time required
15 minutes or less

How to replace the drive block on a top-load washer
The drive block rotates the spin basket. If the basket wobbles or rattles in the spin mode because the drive block is wo…
Repair difficulty
Time required
60 minutes or less
Effective articles & videos to help repair your washers
Use the advice and tips in these articles and videos to get the most out of your washer.

Agitator or impeller? One scrubs, one swirls. Find out which washer type fits your laundry needs—and why it might explai…

We've put together some tips on keeping your washing working well.…

Learn about all the convenient features on our Sears PartsDirect website that make your parts purchases easier.…
Parts & More
Parts
Deflector 117-2314Cover 783-08840Home Electronics PCB Assembly LED 141-0-1939-15391Ic Bracket VKL6996-001Nozzle 2-080226-A00HARNESS,WI 9JZGC28HSL13Loxit Fittin WB02X10012Door Asy Blw AS-63669-01Assembly Cover BN96-12993AHome Electronics Switch TSE720Wire AC-8070-16Tube 5304496463Control Panel DC64-02081AHome Electronics Capacitor VCE0004Display W11282856Jack,large T 150780800Home Electronics Transistor 177621Screw 988514466PCB AMP A1978572APiston KF124338