- Kenmore refrigerator water filters
- Whirlpool refrigerator water filters
- Samsung refrigerator water filters
- GE refrigerator water filters
- LG refrigerator water filters
- Frigidaire refrigerator water filters
- KitchenAid refrigerator water filters
- Maytag refrigerator water filters
- Kenmore Elite refrigerator water filters
- Estate refrigerator water filters
- GE Profile refrigerator water filters
- Amana refrigerator water filters
- Bosch refrigerator water filters
- Dacor refrigerator water filters
- Electrolux refrigerator water filters
CONFIRM THE PART FITS
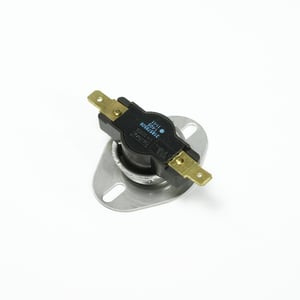
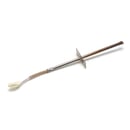
Frigidaire Range High-Limit Thermostat (replaces 318578501) 318578506
Part #318578506
Online Only Price
$35.19 |
15% OFF Phone Price : $41.19
In Stock
For ZIP codes near Edit
This part fits
Previous part number
Part #318578501
Part Information
Basic Information
- Part Name: Range High-Limit Thermostat
- Manufacturer: Frigidaire
- Category: Range Thermostat
- Primary Function: The high-limit thermostat is designed to prevent overheating by tripping when the oven reaches unsafe temperature levels.
Installation & Compatibility
- Compatible Models: Fits various Frigidaire range models; please confirm this part is correct for your model before ordering.
- Installation Difficulty: Medium — involves electrical work; ensure proper safety precautions.
- Tools Required: Screwdriver, work gloves
Additional Information
This high-limit thermostat (part number 318578506) is an essential safety component for ranges. It plays a crucial role in preventing potential damage by shutting off the oven if temperatures exceed safe levels. For safety, it is necessary to unplug the range or shut off the house circuit breaker before installation. Protective gloves should be worn to ensure personal safety.
For detailed installation instructions, refer to our How to replace a wall oven thermal fuse repair guide.
Frequently Used Together
- $291.28 |$12.00 OFF Phone Price : $303.28
- $49.50 |11% OFF Phone Price : $55.50
- $16.06
- $33.53 |15% OFF Phone Price : $39.53
- $59.25
- $186.41 |29% OFF Was : $263.27
- $169.36 |17% OFF Was : $204.49
- $42.25 |12% OFF Phone Price : $48.25
Top models using the same part
| Model Name | Model Number | Diagram Name |
|---|---|---|
| Model #FFEW2415QWA Frigidaire electric wall oven | FFEW2415QWA | Body |
| Model #79046893905 Kenmore electric range | 79046893905 | Body |
| Model #79046892904 Kenmore electric range | 79046892904 | Body |
| Model #79040283410 Kenmore electric wall oven | 79040283410 | Body |
| Model #79040289410 Kenmore electric wall oven | 79040289410 | Body |
| Model #79040282410 Kenmore electric wall oven | 79040282410 | Body |
| Model #79040272410 Kenmore electric wall oven | 79040272410 | Body |
| Model #79040279410 Kenmore electric wall oven | 79040279410 | Body |
| Model #FFEW2415QBA Frigidaire electric wall oven | FFEW2415QBA | Body |
| Model #CFES3025LS2 Frigidaire electric range | CFES3025LS2 | Body |
Reviews
Bad location heat sensor
It is located in a bad spot right under the big burner, keeps tripping. Had to replace it twice. It needs to be located away from the burners. I should get a free one due to bad design
Scott, Missouri
3 people thought this review was helpful.
- Ease of Installation
- Difficult
- Duration of Installation
- 1 - 2 hours
Yes, I would recommend this to a friend
Easy Fix for our issue
Installation was simple and shipping was very fast.
ahunter, West Jefferson, NC
Did you find this review helpful?
- Ease of Installation
- Easy
- Duration of Installation
- 30 minutes - 1 hour
Yes, I would recommend this to a friend
Oven overheating.
I worked with Benjamin at the parts department to determine which part we needed. He was spot on. I also asked him if it was difficult to install. He did say it was easy and that the instructions were on YouTube. Found them, installed the part & now have a working oven again at half the cost. Tell Benjamin he is AMAZING & thank him.
Undisclosed, Portland Oregon
Did you find this review helpful?
- Ease of Installation
- Easy
- Duration of Installation
- 30 minutes - 1 hour
Yes, I would recommend this to a friend
Chat Help
With the help of others posting reviews - our replacement part purchase and install was a success at low cost and stress. The chat personnel were very helpful with sending the install videos. THANX
Melia, Undisclosed
Did you find this review helpful?
- Ease of Installation
- Moderate
- Duration of Installation
- 1 - 2 hours
Incorrect part/ didn't solve issue
There was not a part like this on our model even though the repair/salesman said it would fix our problem. THEN he sent a different part which also didn't repair it. We bought a new stove fromLowes since Sears has closed in our town.
Rental U, Undisclosed
Did you find this review helpful?
- Ease of Installation
- Very Difficult
- Duration of Installation
- Less than 30 minutes
No applicable instruction
No applicable instruction and unable to get C S to understand my type electric range...there are two versions, smooth surface and ring surface.
madwoman, adamsville, tn
Did you find this review helpful?
- Ease of Installation
- Very Difficult
- Duration of Installation
- More than 2 hours
Installed on a Frigidare "built in" range.
Thermostat is mounted on top of the oven fan blower unit in space between top burners and oven. Removed the porcelain top below the burners just enough to get to the thermostat (four screws in front and two on back where top burner unit is attached to the stove). Once accessed, unit is easily replaced.
Duckie, Selma, Alabama
Did you find this review helpful?
- Ease of Installation
- Moderate
- Duration of Installation
- 30 minutes - 1 hour
Lots of disassembly to get to the part.
It's not hard, but it might take over an hour the first time to get to this safety fuse when you diagnose the problem. If you reassemble the stove so you can use the rangetop while you wait for the fuse to arrive, the job should take about 45 minutes, once you know where everything is. If you have the patience, you can save a lot of money doing it yourself, because the part is relatively inexpensive, but the labor for a technician to diagnose and repair the problem can be two hours. You've got to 1. Pull the whole stove out from the cabinet and disconnect the power cord. 2. Remove the control panel. 3. Disconnect the electronic control module. 4. Remove the console that holds the range knobs and disconnect those. 5. Remove the cover that holds the console in step 4. 6. Remove a bracket that supports that cover. 7. On my stove which has traditional spiral elements, I had to lift the rangetop and unscrew the metal cover that separates it from the stove, and then, I could disconnect and remove the fuse to test it for continuity, and replace it when it turned out to be bad.
DavidG, Honolulu, HI
Did you find this review helpful?
- Ease of Installation
- Difficult
- Duration of Installation
- 1 - 2 hours
