Frigidaire Range Oven Temperature Sensor (repla...
Part #316217002
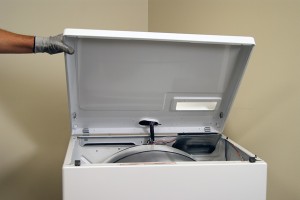
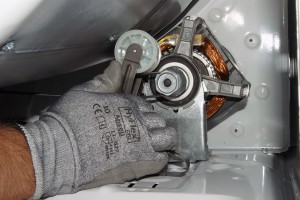
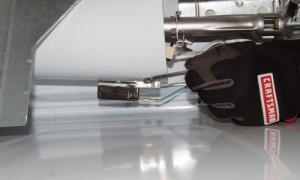
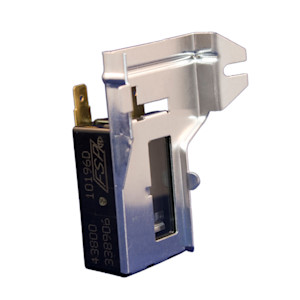
This DIY dryer repair guide explains how to replace the flame sensor on a gas dryer. Located on the burner funnel, the flame sensor detects the igniter temperature. When the igniter is hot enough to light the gas burner, the flame sensor shuts off the igniter, the coils open the gas valves, and the burner ignites. If the flame sensor fails, it won't shut off the igniter, gas won't flow to the burner, and the dryer won't heat. You can determine if the flame sensor is faulty by following the troubleshooting tips in our Gas Dryer Won't Heat Troubleshooting Video. Replace a failed flame sensor with the manufacturer-approved dryer part.
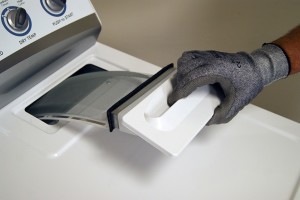
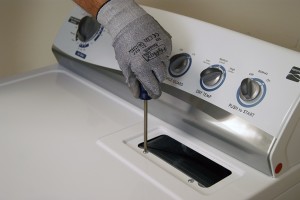
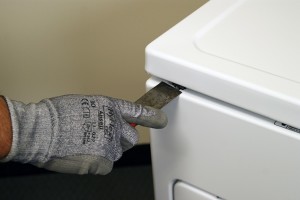
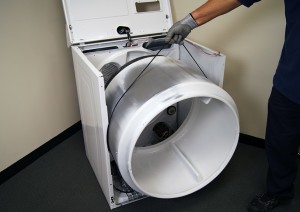
This procedure works for Kenmore, Whirlpool, Maytag, Amana, Roper, Crosley and Estate gas dryers with a lint screen housing located in the top cabinet panel. Although the procedure for opening the dryer cabinet differs, you also can use the same basic repair steps to replace the flame sensor in Frigidaire, GE and Electrolux models.
The video shows how to replace the flame sensor in a gas dryer.
Unplug the dryer to disconnect electrical power. Shut off the gas supply to the dryer.
Wear work gloves to protect your hands.
Pull the lint screen out of the housing in the top panel of the dryer.
Use a Phillips screwdriver to remove the 2 screws that secure the lint screen housing to the top panel.
To release the clips that lock the top of the dryer in place, push a putty knife under the lid near the left and right edges of the front of the dryer.
Lift the top and prop it securely against the wall behind the dryer.
PHOTO: Remove the lint screen.
PHOTO: Remove the lint screen housing screws.
PHOTO: Release the panel locking clips.
PHOTO: Lift the top panel.
Use a slot screwdriver to release the locking tab on the wire harness plug for the door switch. Disconnect the wire harness.
Use a 5/16-inch nut driver to remove the front panel mounting screws from the inside of the cabinet.
Pull the front panel forward slightly, and then lift and unhook it from the 2 bottom hangers.
Pull the front panel off of the dryer and set it aside.
PHOTO: Disconnect the wire harness for the door switch.
PHOTO: Remove the front panel mounting screws.
PHOTO: Remove the front panel.
Note the configuration of the belt on the idler pulley and the motor pulley before removing it—take a digital picture of it so you know how to reinstall it.
Push the idler pulley to the right to release tension on the drive belt.
Pull the drive belt off of the idler pulley and the motor pulley.
Pull the drum out of the dryer and set it aside.
PHOTO: Release the drive belt.
PHOTO: Remove the drum.
Disconnect the wires from the flame sensor.
Remove the mounting screw and pull out the flame sensor.
PHOTO: Disconnect the wires.
PHOTO: Remove the mounting screw.
PHOTO: Remove the flame sensor.
Position the new flame sensor on the burner funnel and reinstall the mounting screw.
Connect the wires to the new flame sensor.
PHOTO: Reinstall the flame sensor mounting screw.
PHOTO: Connect the flame sensor wires.
Place the rear of the drum on top of the support roller that's on the rear panel inside the dryer cabinet.
Lift the front of the drum to access the drive motor and idler pulley. Referring to the digital picture of the configuration, thread the drive belt through the idler pulley.
Push the idler pulley to the right and loop the drive belt over the motor pulley.
Position the front panel on the hangers at the bottom of the cabinet.
Line up the mounting holes and reinstall the screws in the top of the front panel to secure it to the dryer cabinet.
Plug the wire harness back into the plug on the door switch. Make sure the locking tab engages properly.
Lower the top panel and snap it into place.
Reinstall the screws in the lint duct housing and reinstall the lint screen.
Plug the dryer into the wall outlet. Turn on the gas supply to the dryer.
Choose a symptom to see related dryer repairs.
Main causes: bad gas valve coils, broken heating element, tripped safety thermostat or fuse, bad operating thermostat, c…
Main causes: bad drum support roller, damaged idler pulley, broken blower fan blade, worn drum glide bearing, bad drive …
Main causes: damaged door strike, worn door catch…
Main causes: clogged exhaust vent, bad motor relay, loose dryer door catch, bad door switch, control system failure, fau…
Main causes: door switch failure, lack of power, broken belt, blown thermal fuse, bad drive motor, control system failur…
Main causes: clogged exhaust system, heating system failure, deposits on moisture sensor, control system failure…
Main causes: bad timer or electronic control board, door switch failure…
Main causes: lack of electrical power, bad power cord, wiring failure, bad control board, blown thermal fuse, bad door s…
These step-by-step repair guides will help you safely fix what’s broken on your dryer.
The electronic control board manages the components and controls the cycle times in your electric dryer. Follow these st…
The heating element in an electric dryer generates the dryer's heat—it's one of the first things to check if the air in …
A defective drive motor struggles to rotate the drum or might not turn the drum at all. Follow the steps in this dryer r…
Use the advice and tips in these articles and videos to get the most out of your dryer.
Get expert tips on using your dryer efficiently to save energy.…
Learn about all the convenient features on our Sears PartsDirect website that make your parts purchases easier.…
Get answers to frequently asked questions about Sears and Sears PartsDirect.…