- Kenmore refrigerator water filters
- Whirlpool refrigerator water filters
- Samsung refrigerator water filters
- GE refrigerator water filters
- LG refrigerator water filters
- Frigidaire refrigerator water filters
- KitchenAid refrigerator water filters
- Maytag refrigerator water filters
- Kenmore Elite refrigerator water filters
- Estate refrigerator water filters
- GE Profile refrigerator water filters
- Amana refrigerator water filters
- Bosch refrigerator water filters
- Dacor refrigerator water filters
- Electrolux refrigerator water filters
How to rebuild a leaf blower carburetor
This DIY repair guide shows how to rebuild a leaf blower carburetor. The carburetor mixes fuel and air in the right proportions so that the spark plug can ignite the mixture inside the cylinder, powering the engine. If the leaf blower engine won't start even though there's fuel in the tank, the carburetor could be the problem. Clogged fuel and air passages in the leaf blower carburetor need cleaning when they get clogged. Follow these instructions to clean and rebuild a carburetor using a manufacturer-approved gas leaf blower part.
This guide shows how to clean and rebuild the carburetor on Craftsman, Poulan, MTD, Husqvarna, Weed Eater and Troybilt leaf blowers.
Another option is to replace the carburetor, following the steps in How to Replace a Leaf Blower Carburetor.
Quick links
Instructions
Tools required
Torx screwdriver
Needle-nose pliers
Work gloves
Repair difficulty
Time required
60 minutes or less
Repair difficulty
Time required
60 minutes or less
Instructions
- 01.
Drain the fuel tank
In a well-ventilated area, remove the fuel cap and empty the fuel tank into an approved storage container.
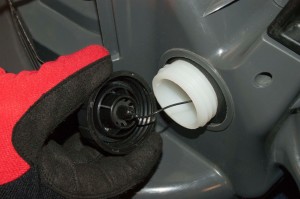
PHOTO: Drain the fuel tank.
- 02.
Disconnect the spark plug wire
Disconnect the spark plug wire.

PHOTO: Disconnect the wire from the spark plug.
- 03.
Remove the air filter cover
Remove the screws from the air filter cover.
Remove the air filter cover.
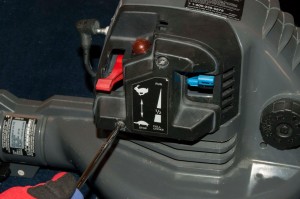
PHOTO: Remove the air filter cover screws.
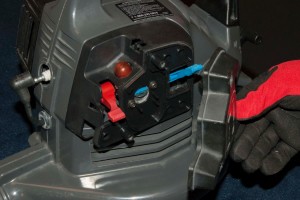
PHOTO: Remove the air filter cover.
- 04.
Remove the carburetor
Remove the carburetor mounting screws.
Pull the air box out and release it from the carburetor throttle and choke levers.
Note the configuration of the small and large fuel lines on the carburetor. Remove the fuel lines from the carburetor.
Discard the carburetor.
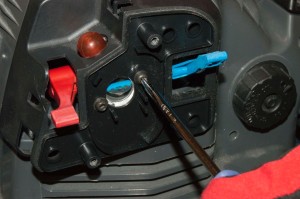
PHOTO: Remove the carburetor mounting screws.
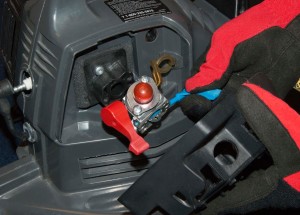
PHOTO: Pull off the air box.
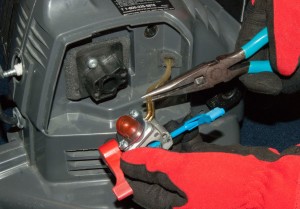
PHOTO: Remove the fuel lines from the carburetor.
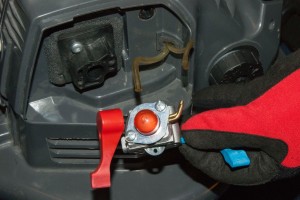
PHOTO: Remove the carburetor.
- 05.
Remove the top cover and primer bulb
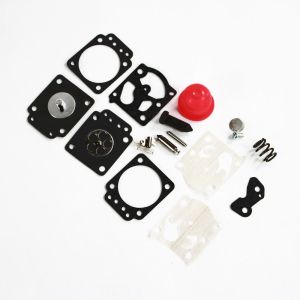
Remove the top cover with the primer bulb from the carburetor.
Remove the primer bulb from the top cover.
Remove the gasket and diaphragm from the top cover.
Replace the primer bulb if it’s stiff or damaged.
Tip: Line up the components on your work surface so that you can replace the parts in order.
PHOTO: Remove the carburetor top cover screws.
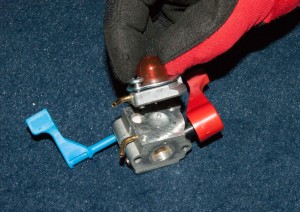
PHOTO: Remove the carburetor top cover.
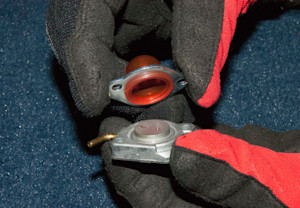
PHOTO: Remove the primer bulb.
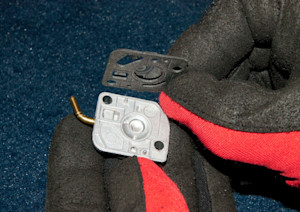
PHOTO: Remove the gasket and diaghragm.
- 06.
Remove the bottom cover and diaphragm
Use a Phillips screwdriver to remove the screws from the bottom cover of the carburetor.
Remove the bottom cover and diaphragm.
Separate the bottom cover and the diaphragm.
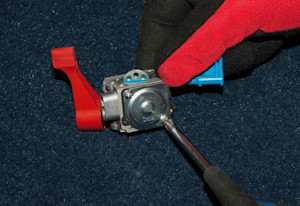
PHOTO: Remove the screws from the bottom cover.
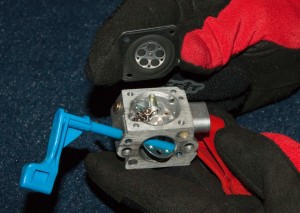
PHOTO: Pull off the bottom cover and diaphragm.
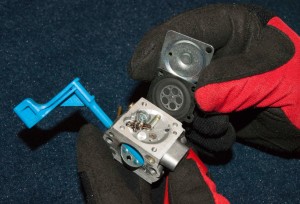
PHOTO: Separate the bottom cover and diaphragm.
- 07.
Remove the screw securing the needle and fuel lever
On the bottom of the carburetor, note how the lever, spring and hinge pin fit together. Remove the screw and pull those components out of the carburetor.
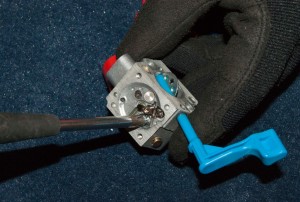
PHOTO: Remove the screw.
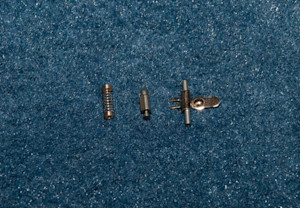
PHOTO: Remove the components.
- 08.
Clean the carburetor and let dry
Clean all ports and jets in the body of the carburetor with aerosol carburetor cleaner and compressed air. Allow the carburetor dry for at least 10 minutes—some carburetor cleaners can damage the diaphragms if the carburetor is reassembled when still wet.
- 09.
Reassemble the carburetor
Install the needle and lever on the bottom of the carburetor and screw them into place. Then install the gasket, diaphragm and cover, in that order.
Install the top cover and primer bulb.
Warning: Install the components in the same order and manner in which they were removed.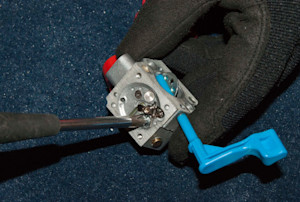
PHOTO: Install the needle and lever.
- 10.
Reinstall the carburetor
Push the fuel lines onto the proper connections on the carburetor.
Insert the carburetor into the air box with the throttle and choke levers positioned properly.
Position the carburetor on the side of the engine and reinstall the mounting screws.

PHOTO: Reconnect the fuel lines.
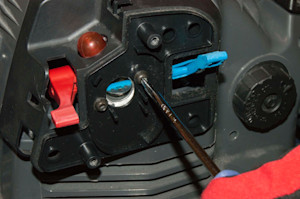
PHOTO: Reinstall the carburetor mounting screws.
- 11.
Reinstall the air filter cover
Position the air filter cover over the carburetor and secure it with the mounting screws.
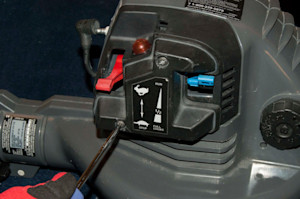
PHOTO: Reinstall the air filter cover.
- 12.
Connect the spark plug
Reattach the spark plug wire.
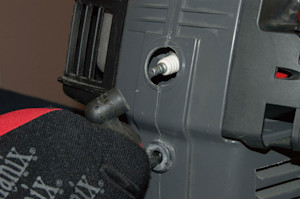
PHOTO: Reattach the spark plug wire.
Warning: Undertaking repairs to appliances can be hazardous. Use the proper tools and safety equipment noted in the guide and follow all instructions. Do not proceed until you are confident that you understand all of the steps and are capable of completing the repair. Some repairs should only be performed by a qualified technician.
Was this information helpful?

Symptoms for gas leaf blowers
Choose a symptom to see related leaf blower repairs.
Main causes: cracked fuel lines, leaky carburetor seals, damaged fuel tank cap, cracked fuel tank…
Main causes: damaged fan blade, engine needs a tune up, dirty carburetor…
Main causes: stale fuel, dirty air filter, bad spark plug, cracked fuel lines, clogged carburetor…
Main causes: mixing too much 2-cycle oil with the gas, dirty air filter, clogged carburetor, engine needs tune up…
Main causes: bad gas, clogged air filter, cracked fuel lines, clogged fuel filter, dirty carburetor, bad spark plug, wor…
Repair guides for gas leaf blowers
These step-by-step repair guides will help you safely fix what’s broken on your leaf blower.

How to replace a leaf blower carburetor
The carburetor could be the problem If the leaf blower engine won't start even though there's fuel in the tank. Follow t…
Repair difficulty
Time required
15 minutes or less

How to replace leaf blower fuel lines
Leaf blower fuel lines deteriorate with time and eventually can split or crack. You can remove and replace them yourself…
Repair difficulty
Time required
60 minutes or less

How to rebuild a leaf blower carburetor
If the leaf blower engine won't start even though there's fuel in the tank, the carburetor could be the problem. Follow …
Repair difficulty
Time required
60 minutes or less
Articles and videos for gas leaf blowers
Use the advice and tips in these articles to get the most out of your leaf blower.

Learn about the top 10 must-have electric lawn & garden tools for 2023…

Get answers to frequently asked questions about Sears and Sears PartsDirect.…

Follow this advice for caring for your leaf blower.…