- Kenmore refrigerator water filters
- Whirlpool refrigerator water filters
- Samsung refrigerator water filters
- GE refrigerator water filters
- LG refrigerator water filters
- Frigidaire refrigerator water filters
- KitchenAid refrigerator water filters
- Maytag refrigerator water filters
- Kenmore Elite refrigerator water filters
- Estate refrigerator water filters
- GE Profile refrigerator water filters
- Amana refrigerator water filters
- Bosch refrigerator water filters
- Dacor refrigerator water filters
- Electrolux refrigerator water filters
Radiant surface element on range not working video


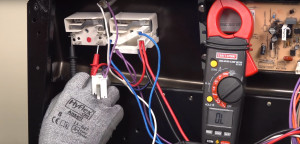
This video from Sears PartsDirect shows what to check when a radiant surface element—or burner—on your range won’t heat. A failed element, wiring failure or a broken surface element control switch could be the reason the stovetop element’s not working.
For more DIY help with your electric or gas range, check out our repair help page for troubleshooting tips and videos, repair guides and error code charts.
Hi, Wayne here from Sears PartsDirect. Today we’re going to help you figure out what’s wrong when a radiant surface element—or burner—on your range won’t heat.
A failed element, wiring failure or a broken surface element control switch could be the reason the element’s not working.
In this video, I’ll guide you through the troubleshooting steps that can help you find out which part failed. These tips are for most ranges with a single-ring radiant surface. For a dual-ring radiant surface element, watch our video Dual-Ring Radiant Surface Element Not Working.
Tools and supplies you may need
You’ll need a nut driver to remove the upper back panel. You also need a Phillips screwdriver and a sturdy prop such as a 2-by-4 piece of wood to prop open the cooktop. For electrical checks, you need a multimeter.
Test the surface element control switch
First we’ll test the surface element control switch in the control panel.
Unplug the range and pull it forward so you can get to the back. Remove the screws and pull off the top back panel.
Find the control switch for the surface element that isn’t working. Take a picture of the wires connected to the surface element control switch so you’ll know how to reconnect them later. This switch has plastic wire harness connectors that you can only insert in the correct location, but it’s always a good idea to have a photo as a reminder.
Pull the wires off the surface element control.
The spades have labels—L1, H1, L2 and H2.
Internal contacts in the surface element control switch let current flow from the L1 spade to the H1 spade and from the L2 to H2 spade when you turn the switch on. Each set of spades supplies 120 volts of the 240 volts required to heat the element. If either contact is broken, current won’t flow and the element won’t heat.
Let’s start by checking the L1-to-H1 contact using a multimeter.
Turn on the surface element control knob.
With your multimeter set to measure resistance, touch one meter lead to the L1 spade and the other meter lead to the H1 spade.
If the multimeter measures OL, the internal switch contact isn’t working, so you need to replace the surface element control switch. This should fix your burner heating problem.
If the measurement is near 0 ohms of resistance across these spades, the first internal contact in the control switch is sending current to the surface element and working okay.
You’ll need to test the second contact in the surface element control switch.
Touch one meter lead to the L2 spade and the other meter lead to the H2 spade.
If the multimeter measures OL, replace the surface element control switch because the switch’s internal contact isn’t sending current to the element through the spades.
If it measures near 0 ohms of resistance across L2 and H2, the control switch is okay and a wiring failure or a broken surface element is preventing the surface element from heating.
Check the surface element and wiring
Let’s check for a broken surface element or a broken wire between the control switch and the element, by checking the element wires that connect to H1 and H2 on the control switch. These wires carry current from the control switch through the element.
The brown wires connect the control switch to the element for this burner. Measure the resistance through them by touching one meter lead to the end of one brown wire connector and the other meter lead to the end of the other.
If you measure between 20 and 80 ohms resistance through the brown wires, the element and the wires that connect it to the control switch are okay. That means you’ve eliminated all potential failures except a break in the supply wiring going to the surface element control switch. You’ll learn how to test that control switch supply wiring later in this video. If you want to skip ahead to that section, look for the slide titled “How to Test the Control Switch Supply Wiring.”
Now, if you measure OL through the brown wires, then a broken element or wiring failure is preventing the surface element from heating.
Let’s check the element next.
To get to the surface element, open the oven door and remove the screws from the bottom of the front lip of the cooktop frame. Move the oven door out of the way. Carefully pull the cooktop slightly forward to release the front lip of the cooktop frame from the front cabinet support bracket. Raise the front of the cooktop slightly to release the frame sides from the front support bracket and then pull the cooktop forward to release the hinge tabs from the slots in the backguard.
Lift the front edge of the cooktop and place a prop where it’s steady, so the cooktop won't fall. Don’t damage the insulation when propping open the cooktop, or you’ll have to replace it.
Carefully pull the brown wires off the element spades and measure the resistance through those spades. If you measure OL, replace the radiant surface element because it’s broken.
In most ranges, the thermal limiter comes with the radiant surface element. A few ranges offer the thermal limiter as a separate part. If you see it listed separately on the parts diagram for your range, you may only need to replace the thermal limiter. Refer to the wiring diagram for your range and check resistance through the thermal limiter to determine whether the limiter or the element is bad. Replace the failed part.
If the multimeter measures between 20 and 80 ohms of resistance through the element, a break in one of the element wires is keeping the surface element from heating, so replace the element wires. Order the entire wire harness for the range unless the parts diagram lists surface element supply wires separately for your model.
If the surface element wires’ insulation is still intact—meaning there’s no chance of the failed wires shorting to metal inside the range—you can safely reconnect the wires to the element and the control switch and then reassemble the range. Restore power, move the range back into place and continue using the other burners on the range until you replace the broken element wires.
How to test the control switch supply wiring
Now, we’ll show you how to test the control switch supply wiring. You'll want to do this if you measured between 20 and 80 ohms of resistance through the brown wires that connect to the surface element control switch, and the surface element control switch is okay. This means a supply wire failure is keeping the element from heating. Let’s check those wires.
Remove the screws and pull off the bottom back panel. First, check the black wire that connects to the L1 spade on the surface element control switch.
Measure the resistance between the end of the black wire that connects to the L1 spade on the switch and the black wire on the terminal block. If the wire is okay, the multimeter will measure near 0 ohms. A measurement of OL means the wire is broken, so either replace the wire harness or find and repair the break in the black wire going to the control switch.
If the black wire is okay, measure the resistance between the red wire that connects to the L2 spade on the switch and the red wire on the terminal block. If the wire is okay, the multimeter measures near 0 ohms of resistance. If not, find and repair the break in the red wire or replace the wire harness.
You’re almost done! All you need to do now is reconnect the wires to the surface element control switch using your picture as a guide and reassemble the range.
We hope this video helped you out today. Check out our other videos here on the Sears PartsDirect YouTube Channel. Subscribe and we’ll let you know when we post new videos.
Symptoms for electric ranges
Main causes: faulty surface element, burner control switch failure, temperature limiter not working properly, loose wiri…
Main causes: impact from dropping an item on the glass surface, ceramic glass surface flaw, surface element temperature …
Repair guides for electric ranges

How to replace a range hidden bake element
These step-by-step instructions guide you through replacing the oven hidden bake element in an electric range.…
Repair difficulty
Time required
30 minutes or less

How to replace an electric range oven door outer glass panel
Learn how to replace a damaged outer window panel on your oven door with these step-by-step instructions. …
Repair difficulty
Time required
45 minutes or less

How to replace a range glass cooktop
These step-by-step instructions explain how to replace a damaged ceramic glass cooktop on an electric range. …
Repair difficulty
Time required
45 minutes or less
Articles and videos for electric ranges

Learn about the differences between cooking on gas and electric stoves.…

Learn about all the convenient features on our Sears PartsDirect website that make your parts purchases easier.…

Get answers to frequently asked questions about Sears and Sears PartsDirect.…