Lock stuck after self-cleaning cycle
Hi, this is Wayne from Sears PartsDirect. Today we’re going to talk about an oven with a malfunctioning door lock. You’re probably watching this because your oven door is stuck shut. Let me guess, did you just run a self-cleaning cycle?
During the cleaning cycle, your door will lock for your safety. Under normal circumstances, the door won't unlock until the oven has cooled to room temperature. The thing is, if you lose or disconnect power before the cycle is finished, the lock motor may not complete the cycle to unlock the door. We’ll show you how to reset the lock and get things working again.
Get the door open
But, the lock motor itself could be broken. So we’ll also show you how to test that out while you’re back there. Now that it's stuck shut, let me show you how you can get it open fast and get back to cooking.
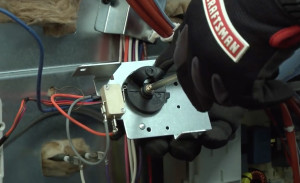
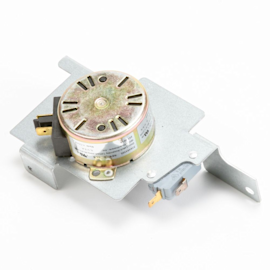
Pull the range out from the wall and disconnect the power. Remove the back panel to gain access to the lock motor assembly. Remove the screws holding the door lock assembly in place. Release the door-latching rod by pulling the lock motor assembly down and tilt the front inwards. This will allow you to unhook the locking rod from the drive cam.
Push the rod forward and open the oven door. Note the position of the drive cam and the hole that the locking rod fits into. Remove the Philips screw holding the drive cam on the motor. Remove the drive cam and rotate it 180 degrees from where it was when the door was locked.
Line up the two slots on the bottom of the drive cam with the posts on the motor shaft. Push the drive cam down and lock it on the motor shaft. Make sure that the switch arm aligns with the side edge of the drive cam. Reinstall the Phillips screw on the cam.
Re-hook the locking rod back onto the drive cam. Install the motor bracket assembly back onto the range. Now, you can put everything back together, and at least be able to cook again.
Test the door lock
But if you’ve got a bad door lock, your door is going to get stuck again the next time you run a cleaning cycle. We’ll check the lock motor circuit for electrical continuity with a multimeter while we’ve got this back panel off. Always disconnect power before checking continuity. Locate the two electrical wires going to the lock motor and disconnect them.
Set your meter to read ohms of resistance on the 20,000 ohms scale. Place one meter lead on each terminal of the lock motor. If you measure no continuity, on this meter that’s a “1” on the far left corner, then the door lock is bad and will need to be replaced. Here's a video that will show you how to do that.
Fix broken wires
If the lock motor reads about 2000 ohms on the multi-meter, then the motor is good. Let’s see if there’s a break in wire harness next. Plug the wires back into the lock motor. Remove the upper back panel.
Locate the two wires from the motor that are connected to the electronic control board (that's the brown and white wires on this model). Disconnect the wires from the electronic control board and put one meter lead on each wire. If your meter shows no continuity then you will need to repair the broken wire in the harness. Here's a video about repairing broken wiring.
Check the electronic control board
If you get a reading of about 2000 ohms, then both the harness and door lock are ok. That tells you that the electronic control board is failing to send current to the lock motor. You’ll need to replace the control board. Here’s a video showing you how to replace the board on a gas range and on an electric range.
Hey, thanks for watching. I hope that this video helped you out today. Be sure to check out our other videos, here on the YouTube Channel, and don't forget to subscribe.


