
Frigidaire Dryer Drum Belt (replaces 134163400,...
Part #134503600
$8.11 |
11% OFF Phone Price : $9.11
Frigidaire Dryer Drum Belt (replaces 134163400,...
Part #134503600
Dryer Drum Bearing Kit (replaces 000142850, 142...
Part #5303281153
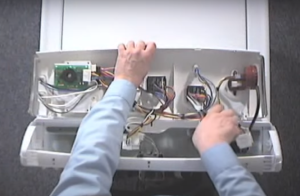
This step-by-step DIY repair video shows how to disassemble the control console and remove the following parts on a Maytag Atlantis III top-load washer:
Timer.
Signal chime.
Water level pressure switch.
Water temperature switch.
Wash/Spin speed selector switch.
Lid switch.
If you’re unsure whether a control needs replacing, have a Sears Technician visit your home to diagnose and repair your Maytag washer.
Here are the steps shown in the video.
Unplug the washing machine to disconnect electrical power.
Remove the 3 Torx-head screws from the top of the control console.
Tip the console down to access control components.
Disconnect the wire harness plugs and the water level pressure switch air tube.
Remove the console from the washer.
Use the flat blade of a putty knife to pry off the control knobs from the water level pressure switch, water temperature switch and wash/spin speed selector switch. Note: To avoid scratching the console, cover the putty knife blade with tape.
Pry off the outer timer knob.
Lift off the timer knob body and timer skirt.
Pull off the air tube and disconnect the wire harness from the water level pressure switch if you didn’t already pull them off and remove the console from the washer.
Lift up on the locking tab and turn the switch clockwise to release it from the console.
Remove the water level pressure switch.
Disconnect the wires from the switch if you didn’t already pull them off and remove the console from the washer. The switches are labeled with wire colors so you can reconnect the wires properly when reassembling the washer.
Release the locking tab and turn the switch to release it.
Remove the selector switch from the console.
The signal chime is on the back of the timer.
Disconnect the signal chime wire harness.
Use needle-nosed pliers to depress the locking tabs on the mounting posts and remove the signal chime.
Depress the locking tab.
Slide the timer to the side and pull it off the console.
Disconnect the wire harness and remove the timer.
Disconnect the wire harness from the lid switch.
Lift up on the lid switch locking tab.
Slide the lid switch toward the front of the washing machine to release it.
Remove the lid switch.
If you’re not completely confident that you can safely complete the repairs shown in the video, have a service technician repair the washer.
To help keep your Maytag washer in top shape, schedule a Sears Technician to perform a Clean & Maintain service on the washing machine. Having a service professional clean and maintain your washer annual will help it run more efficiently and last longer.


The shifter motor switches the washer's drive motor between the agitate and spin modes. If your washer's basket won't bu…

The electronic control board is a major component that orchestrates the washer's functions. These instructions explain h…

The drive motor creates the rotation that turns the spin basket and agitator. If those components won't budge, replace t…

Find tips for using your washing machine efficiently to save energy and help reduce utility bills.…

Learn about all the convenient features on our Sears PartsDirect website that make your parts purchases easier.…

Get answers to frequently asked questions about Sears and Sears PartsDirect.…