Tools and parts used
Locked control panel buttons
Hi, Wayne here from Sears PartsDirect. Today we're going to talk about what to do when your dishwasher won't start. First, push in firmly on the front of the door near the top to make sure it’s shut tight. The dishwasher won’t start if the door isn’t latched completely.
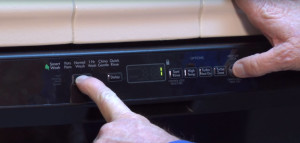
Next, try pushing buttons on the control panel. If nothing happens, check the light below the lock icon. If it’s lit, the keys are locked. Press and hold the control lock button until the lock light turns off. You can now select and start a cycle. If this doesn’t work for you, check your owner's manual for how to disable the control lock on your model.
If you start a cycle and the time counts down but the dishwasher doesn’t run, the dishwasher could be in the Sales Demo mode. It could be you bought a display model, or maybe a child played with the buttons and hit the right sequence. To exit demo mode, you have to press the control buttons in a certain sequence. For example, on this dishwasher, press and hold the Cycles button. After 5 seconds, the time goes blank. Continue holding the Cycles button while you press Start 3 times. Release the Cycles button, and the control exits the Sales Demo mode. You can now select a cycle and start the dishwasher.
Your dishwasher might use a different sequence to exit the demo mode. This chart shows the process for several common dishwashers.
Faulty door switch
Now let’s talk about the door switch. A faulty door switch will keep the dishwasher from starting. If the door switch is stuck in the "open" position, the dishwasher won't start because it's waiting for you to shut the door—even if you did shut the door.
On this model, the start button and time display start blinking because the control thinks the door is open. Your model may not act that way, it may just sit idle and not start.
Many dishwashers also won’t run if the door switch is stuck in the closed position. The control expects you to open the door after the load is done. If the door switch sticks in the "closed" position, the control won’t detect that you opened the door, so you can’t start the next cycle.
To check for this problem, turn the house circuit breaker for the dishwasher off and then on again, or unplug the dishwasher and plug it back in. This process simulates the door opening so the control starts the cycle. If you can now start the dishwasher now, the door switch is stuck in the closed position. You’ll likely need to replace the door switch to fix this problem.
To confirm a faulty door switch, check the resistance through the door switch with a multimeter. Disconnect electrical power to the dishwasher by shutting off the house circuit breaker or unplugging the dishwasher. Remove the Torx screws from the outer edges of the inner door panel. Support the outer door panel with one hand as you remove the final screws so it doesn't fall.
Separate the outer door panel and the control panel slightly from the inner door panel, and rest the outer panel on the floor while you disconnect the user interface control wire harness. Pull off the outer door panel and control panel.
Release the door latch assembly from the inner door panel and unplug the wire harness from the door switch. Carefully trip the door switch by pushing this lever, keeping your fingers away from the spring and latch. Press the door switch lever to simulate a closed door that's engaging the door switch.
With the multimeter set to check resistance, place a meter probe against each of the door switch prongs. You should measure near 0 ohms of resistance, or continuity, through a working door switch. If you measure infinite resistance—on this meter that's a 1 in the far left corner—replace the door switch because it's defective.
Other causes
If you measure continuity through the door switch, it’s likely that a defective control board or a wiring failure elsewhere in the dishwasher is keeping the dishwasher from starting. Have a Sears’ service technician examine and repair this type of failure. The technician can conduct live voltage checks—which should only be performed by someone with proper training—to determine the exact cause of the problem.
I hope this video helped you out. Check out our other repair videos on the Sears PartsDirect YouTube channel. Subscribe and we’ll let you know when we post new videos.


