CONFIRM THE PART FITS

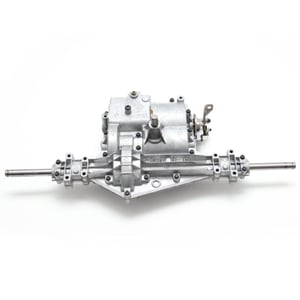
Lawn Tractor Transaxle 794711
Part #794711
Part Information
This transaxle (part number 794711) is for lawn tractors.
Transaxle 794711 connects the engine to the drive wheels on the lawn tractor.
Let the engine cool and disconnect the spark plug wire before servicing the lawn tractor. Wear work gloves to protect your hands.
Frequently Used Together
- $74.07
- $41.75 |13% OFF Phone Price : $47.75
Top models using the same part
| Model Name | Model Number | Diagram Name |
|---|---|---|
| Model #143205-507B Craftsman engine & drivetrain | 143205-507B | Peerless transaxle 205-507b |
| Model #917205-507B Craftsman engine & drivetrain | 917205-507B | Peerless transaxle 205-507b |
| Model #205-507B Peerless engine & drivetrain | 205-507B | Peerless transaxle 205-507b |
| Model #930-054B Peerless engine & drivetrain | 930-054B | Peerless transaxle |
| Model #P930-054A Peerless engine & drivetrain | P930-054A | Transaxle p930-054a |
| Model #930-054A Peerless engine & drivetrain | 930-054A | Peerless transaxle 930-054a |
| Model #917P930-054A Craftsman engine & drivetrain | 917P930-054A | Transaxle p930-054a |
| Model #143930-054A Craftsman engine & drivetrain | 143930-054A | Peerless transaxle 930-054a |
| Model #143205-544C Craftsman engine & drivetrain | 143205-544C | Peerless transaxle |
| Model #143206-544C Peerless engine & drivetrain | 143206-544C | Transaxle |
Reviews
Lawn tractor transaxle installation
Excellent product. The transaxle installed with no problem. The axle length is shorter that the one that was removed, and required downsizing of the axle spacers which involved simply cutting off a short piece of the original spacer. During the installation, as the trans axle is being brought into position , engage the emergency rod/spring assembly into the arm on the right side of the unit, then attach the trans axle to it's transaxle brackets over the axle with the four mounting bolts.Next loosen ( but do not remove ) the three bolts that attach the transaxle bracket to the chassis. Next attack the vertical two anti-torque straps (one left ,one right) on the front of the unit.( You will need to use the bolts from the old unit as these are self-tapping bolts that you will need to self-tap into the appropriate holes on the new unit.Likewise for the bolt that attaches the Belt keeper bar unit on the top-front of the unit) The new unit comes with untapped hole for these bolts, but the bolts from the old unit taps in nicely. Now that all the supporting bolts are in place then proceed to tightening them. Next with the shift-lever in neutral, loosen but do not remove the shift adjustment bolt, determine that the transaxle is in neutral ( both wheels should simultaneously spin in the same direction) then attach the shift arm to the transaxle shift shaft. Next retighten the shift lever adjustment bolts and the installation is done. Attach the drive belt and that should be it.
none, webster NY
1 person thought this review was helpful.
- Ease of Installation
- Easy
- Duration of Installation
- 30 minutes - 1 hour
Yes, I would recommend this to a friend
Good Transaxle
Out of the box it was a bit dirty, after cleaning off and checking the Gear fluid level installed in an hour
Deereman, Lower, 48
5 people thought this review was helpful.
- Ease of Installation
- Very Easy
- Duration of Installation
- 30 minutes - 1 hour

