November 20, 2022

How to adjust snowblower engine valve lash

How to adjust snowblower engine valve lash

This illustrated repair guide and DIY YouTube video give step-by-step instructions for adjusting the valve lash on a common snowblower engine.

What is engine valve lash?

Valve lash is the space between the top of the valve stem and the rocker arm when the piston is at the top of its travel (top dead center) inside the engine cylinder. At this point, a valve should be fully closed. When the piston is at top dead center of the compression stroke, both the intake and exhaust valves should both be fully shut.

Incorrect valve lash prevents the valve from opening or closing properly.

Bad valve lash adjustment can make the engine:

  • Hard to start.

  • Sluggish when running.

  • Underpowered.

Check and adjust engine valve lash when the engine exhibits these symptoms and basic troubleshooting doesn’t fix the problem.

Engine manufacturers also recommend that you check valve lash after the first 25 hours of use and then after every 100 hours of engine use.

What is top dead center (TDC)?

Top dead center is the position of the piston when it’s at the very top of its travel inside the engine cylinder. When the cylinder is at TDC, a valve will be fully shut so you can accurately measure valve lash. When you position the piston at TDC for the compression stroke, both the intake and exhaust valves should be fully shut so you can check valve lash for both valves on many types of snowblower engines. Valve lash should only be measured and adjusted when the piston is at TDC.

What types of snowblower engines need valve lash adjustment?

MTD, Briggs & Stratton and other brands of engines on snowblowers typically need valve lash adjustments to start and run smoothly. Check the engine owner’s manual for valve lash guidelines for the engine on your snowblower or snow thrower.

This video shows how to adjust valve lash on a typical MTD engine that is commonly used on these brands of snowblowers:

Follow the procedure for checking and adjusting valve lash listed in the owner’s manual for your snowblower or your snowblower’s engine. (Many snowblowers and snow throwers have a separate owner’s manual for the engine.)

Quick links
Tools required
Wrench set
Work gloves
12-inch wood dowel
Feeler gauge
Socket set with ratchet
Ratchet extension
13/16-inch spark plug socket
Needle-nose pliers
Shop towel
Torque wernch
Repair difficulty
Time required
15 minutes or less
Repair difficulty
Time required
15 minutes or less
Adjusting the valve lash on a snowblower

This video explains how to adjust the valve last on a snowblower.

Instructions

  1. 01.

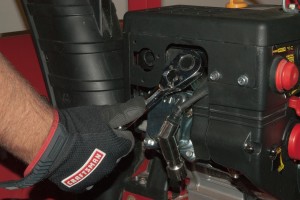
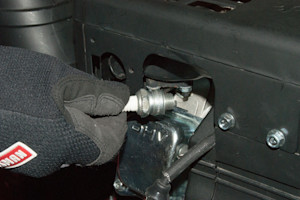
    Remove the spark plug

    Use a deep socket and a ratchet to remove the spark plug from the cylinder.

    PHOTO: Loosen the spark plug.

    PHOTO: Loosen the spark plug.

    PHOTO: Remove the spark plug.

    PHOTO: Remove the spark plug.

  2. 02.

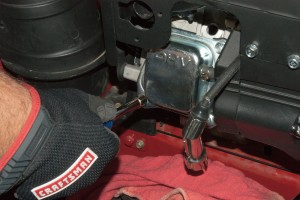
    Remove the rocker cover

    Place a shop towel under the rocker cover to catch oil.

    Remove the 4 rocker arm cover screws using a socket.

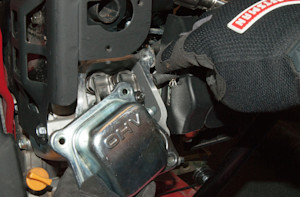
    Pull the rocker cover off the engine.

    Squeeze the breather hose clamp and pull the hose off the rocker cover.

    Remove the rocker cover.

    PHOTO: Remove the screws.

    PHOTO: Remove the screws.

    PHOTO: Remove the rocker cover.

    PHOTO: Remove the rocker cover.

  3. 03.

    Position the piston at top dead center

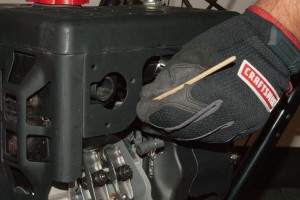
    Insert a 12-inch wooden dowel into the spark plug hole and rest it on top of the piston.

    Slowly pull the starter rope to cycle both valves and reach the compression stroke. You’ll know you’ve reached the compression stroke when both valves are closed and the piston is moving up.

    Continue to pull the starter rope until the dowel reaches its full extension out of the spark plug hole.

    Both valves will be closed and both rocker arms will be slightly loose when the piston is at top dead center on the compression stroke.

    PHOTO: Insert a dowel.

    PHOTO: Insert a dowel.

  4. 04.

    Measure the valve lash clearance

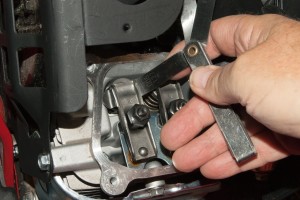
    Insert the feeler gauge between the intake rocker arm and valve stem to measure valve lash clearance.

    The intake valve is on the carburetor side of the engine.

    Intake valve lash clearance should be .003-inch to .005-inch on this engine.

    Try to insert a feeler gauge leaf into the gap between the rocker arm and the valve stem until you find the leaf that slips in with slight resistance.

    Note the measurement on the leaf that fits the intake valve lash clearance.

    Repeat the measurement process for the exhaust valve on the muffler side of the engine.

    The exhaust valve lash clearance should be .005-inch to .007-inch.

    Note the measurement on the leaf that fits the exhaust valve lash clearance.

    PHOTO: Measure the valve lash clearance.

    PHOTO: Measure the valve lash clearance.

  5. 05.

    Adjust the valve lash clearance

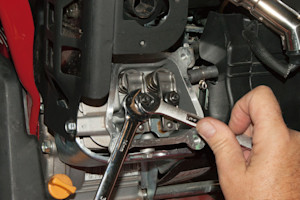
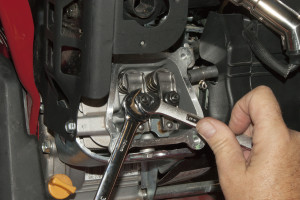
    Loosen the jam nut while holding the fulcrum nut stationary with a wrench.

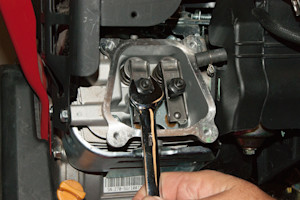
    Turn the rocker arm fulcrum nut clockwise to decrease the interior valve lash clearance or counterclockwise to increase it.

    Once you reach the proper valve lash clearance, hold the rocker arm fulcrum nut stationary with a wrench and tighten the jam nut to 80- to 106- inch-pounds using a torque wrench.

    Recheck the valve lash clearance after tightening the jam nut.

    Adjust the valve lash clearance on the exhaust valve if needed.

    PHOTO: Loosen the jam nut while holding the fulcrum stationary.

    PHOTO: Loosen the jam nut while holding the fulcrum stationary.

    PHOTO: Adjust the valve lash clearance.

    PHOTO: Adjust the valve lash clearance.

  6. 06.

    Recheck the valve lash clearance

    Rotate the engine through several compression cycles.

    Return the piston to top dead center of the compression stroke.

    Recheck the valve lash clearance and adjust the valves again if necessary.

  7. 07.

    Reinstall the rocker cover

    Clean up oil around the rocker arms.

    Examine the rocker cover gasket and replace it if damaged. Clean any old gasket residue off the cylinder head and rocker cover before installing a new gasket.

    With the gasket pressed into the rocker cover, reinstall the rocker cover on the engine.

    Tighten the rocker cover screws to 62- to 80-inch-pounds using a torque wrench.

    Reattach the breather hose and secure it using the hose clamp.

    Warning: Over tightening the rocker cover screws could cause an oil leak between the rocker cover and cylinder head.
  8. 08.

    Reinstall the spark plug

    Thread the spark plug into the cylinder and tighten it using the deep socket and ratchet. Reconnect the spark plug wire.

Warning: Undertaking repairs or maintenance to appliances or power equipment can be hazardous. Should you choose to undertake repairs or maintenance, you are assuming the risk of injury to your person or property. In an effort to reduce the risk, use the proper tools and safety equipment noted in the applicable guide and follow all instructions. Do not proceed until you are confident that you understand all of the steps and are capable of completing the repair. Some repairs or maintenance, however, should only be performed by a qualified technician.

Symptoms for gas snowblowers

Choose a symptom to see related snowblower repairs.

Main causes: punctured tire, damaged rim…

Main causes: dirty carburetor, stale fuel…

Main causes: dirty carburetor, clogged fuel filter, dirty spark plug, incorrect valve lash, leaky engine gaskets…

Main causes: stale gas, clogged carburetor, clogged or broken fuel line, dirty spark plug, bad rewind starter, incorrect…

Main causes: snow build-up in chute, chute drive mechanism failure, bad chute control assembly…

Main causes: loose drive clutch cable, damaged drive clutch cable, worn friction disc, scraper blade scraping the ground…

Main causes: clogged chute, damaged auger blades, broken shear pins, worn auger belt, damaged gear case, engine problems…

Main causes: broken shear pins, worn or loose auger drive belt, auger drive cable failure, damaged auger, bad gear case…

Things to do: replace the spark plug, change the oil, rebuild the carburetor, adjust valve lash, adjust or replace the b…

Repair guides for gas snowblowers

These step-by-step repair guides will help you safely fix what’s broken on your snowblower.

How to replace a snowblower fuel filter

How to replace a snowblower fuel filter

Replace the fuel filter on your snowblower if it's clogged or damaged.…

Repair difficulty
Time required
 15 minutes or less
How to replace a snowblower shave plate

How to replace a snowblower shave plate

Follow the 7 easy steps in this repair guide/video to replace a worn out shave plate on your snowblower.…

Repair difficulty
Time required
 15 minutes or less
How to replace a snowblower chute control gearbox assembly

How to replace a snowblower chute control gearbox assembly

Replace the chute control gearbox on your snowblower if it's stripped or damaged.…

Repair difficulty
Time required
 15 minutes or less

Effective articles & videos to help repair your snowblowers

Use the advice and tips in these articles and videos to get the most out of your snowblower.

How to make your snowblower last longer

How to make your snowblower last longer

Learn the steps to take to adjust and maintain your snowblower so it lasts longer.…

Introducing new technical repair content that we’re developing for the Sears Technical Institute

Introducing new technical repair content that we’re developing for the Sears Technical Institute

Learn about Sears Technical Institute and the advanced technical content being developed for aspiring appliance techs.…

Top questions about Sears and Sears PartsDirect

Top questions about Sears and Sears PartsDirect

Get answers to frequently asked questions about Sears and Sears PartsDirect.…

Chat